20 Days Semi permanent makeup
About This Course
This specialized course focuses on semi-permanent makeup techniques and lash/brow enhancement procedures, equipping aspiring beauty professionals with advanced skills in microblading, powder brows, lip tinting, BB glow, brow lamination, eyelash extensions, lash lifts, and brow tinting. Through hands-on training and expert guidance, students will master these techniques to meet diverse client needs and build a successful career in the beauty industry.
Course Outline
Powder browsPowder Brows Presentation Outline
- Introduction
- What are Powder Brows?
- Difference between Powder Brows and Microblading
- Rise in popularity and demand
- Benefits of Powder Brows
- Soft, natural makeup-like finish
- Suitable for all skin types (especially oily or mature skin)
- Long-lasting results (1–3 years)
- Less invasive and more comfortable than microblading
- Ideal Candidates
- Sparse or uneven brows
- Sensitive or oily skin
- Clients seeking a fuller, defined look
- Those with previous brow tattoos needing correction
- Contraindications
- Skin conditions (eczema, psoriasis, active acne)
- Pregnancy or breastfeeding
- Blood disorders or certain medications
- Recent facial treatments (chemical peels, laser)
- Tools & Materials
- PMU machine and cartridges
- Pigments (custom shades)
- Mapping tools (ruler, pencil, thread)
- Numbing agents and aftercare kits
- Procedure Steps
- Consultation and brow mapping
- Numbing and skin prep
- Pigment application using shading technique
- Final touch-up and healing overview
- Healing & Aftercare
- Healing timeline (scabbing, fading, touch-up)
- Do’s and Don’ts post-procedure
- Recommended skincare and sun protection
- Results & Expectations
- Immediate enhancement with gradual settling
- Touch-up required after 6–8 weeks
- Longevity based on skin type and lifestyle
- Risks & Safety
- Mild redness or swelling
- Importance of certified technicians
- Hygiene and sterilization protocols
Lip Tint
- Introduction
- What is lip tint?
- Brief history and evolution in cosmetics
- Difference between lip tint, lipstick, and lip stain
- Benefits of Lip Tint
- Lightweight and natural finish
- Long-lasting color
- Smudge-proof and transfer-resistant
- Hydrating formulas available
- Types of Lip Tints
- Water-based
- Gel-based
- Cream or mousse tints
- Oil-infused tints
- Ingredients & Formulation
- Common active ingredients (e.g., hyaluronic acid, plant extracts)
- Pigments and dyes used
- Safety and hypoallergenic considerations
- Application Techniques
- Prep: exfoliation and hydration
- Tools: applicator wand, brush, or fingers
- Layering for intensity
- Blending for gradient or ombré effects
- Target Audience
- Teens and young adults
- Minimalist makeup lovers
- Clients seeking low-maintenance beauty
- Marketing & Trends
- Popular shades and seasonal colors
- Social media influence (TikTok, Instagram)
- Celebrity endorsements and brand campaigns
- Aftercare & Removal
- Gentle cleansing methods
- Lip care tips to maintain softness
- Reapplication advice
- Risks & Precautions
- Allergic reactions or irritation
- Patch testing recommendations
- Avoiding expired or low-quality products
6D2 Hair Extensions Presentation Outline
- Introduction
- Brief overview of hair extension methods
- Evolution from traditional to 6D and now 6D2
- Purpose of the presentation
- What Are 6D2 Hair Extensions?
- Definition and how they differ from 6D
- Technology behind the 6D2 machine
- Key features: no glue, heat, or tape
- Benefits of 6D2 Extensions
- ⏱️ Fast application (20 minutes for full head)
- 💆♀️ Low maintenance and easy removal
- 💪 Long-lasting (up to 8–12 months)
- 🌿 Gentle on natural hair
- Application Process
- Step-by-step guide to installation
- Tools required (6D2 applicator, hair cartridges)
- Tips for sectioning hair safely
- Comparison with Other Methods
| Method | Duration | Maintenance | Damage Risk | Cost |
|---|---|---|---|---|
| Clip-in | Minutes | Low | None | Low |
| Tape-in | 1–2 hrs | Medium | Medium | Medium |
| Fusion | 3–4 hrs | High | High | High |
| 6D2 | 20 mins | Low | Very Low | Medium |
- Care & Maintenance
- Recommended products
- Washing and styling tips
- How to extend lifespan
- Challenges & Considerations
- Initial cost of machine and training
- Hair compatibility
- Need for skilled application
Lash Lift & Tint Presentation Outline
- Introduction
- What is a lash lift?
- What is lash tinting?
- Why combine both treatments?
- Popularity and demand in the beauty industry
- Benefits
- Enhances natural lashes without extensions
- Creates a lifted, curled, and darker lash look
- Low maintenance and time-saving
- Lasts 6–8 weeks with proper care
- Ideal Candidates
- Clients with straight or light-colored lashes
- Those seeking a natural enhancement
- Active individuals (gym, swimming, etc.)
- People with allergies to lash extensions
- Contraindications
- Eye infections or irritation
- Allergies to perming or tinting solutions
- Recent eye surgeries
- Pregnancy (patch test strongly recommended)
- Tools & Products
- Silicone shields or rods
- Lash lift adhesive
- Perming and setting lotions
- Tint and developer
- Applicators, eye pads, and cleanser
- Procedure Steps
- Consultation and patch test (24–48 hrs prior)
- Cleanse and prep lashes
- Apply silicone shield and lift solution
- Process and neutralize
- Apply tint and process
- Clean and reveal results
- Aftercare Tips
- Avoid water, steam, and mascara for 24 hours
- Use oil-free products around eyes
- No rubbing or sleeping face-down
- Schedule touch-up every 6–8 weeks
- Results & Expectations
- Immediate lift and color enhancement
- No need for lash curlers or mascara
- Natural fade over time
- Before-and-after photos for client satisfaction
- Risks & Safety
- Mild irritation or allergic reaction
- Importance of patch testing
- Hygiene and sanitation protocols
- Professional vs. DIY kits
Brow Lamination
- Introduction
- What is brow lamination?
- Origins and rise in popularity
- Comparison with microblading and tinting
- Benefits of Brow Lamination
- Creates fuller, fluffier brows
- Corrects asymmetry and unruly hair
- Non-invasive and quick procedure
- Results last 4–6 weeks
- Ideal Candidates
- Clients with sparse or uneven brows
- Those seeking a low-maintenance brow look
- People with coarse or downward-growing brow hair
- Contraindications
- Skin conditions (eczema, psoriasis, dermatitis)
- Recent eye surgeries or infections
- Pregnancy or breastfeeding
- Allergies to perming solutions
- Tools & Products
- Brow lifting cream
- Neutralizer and nourishing oil
- Brow cleanser and cling film
- Mapping tools, spoolies, and applicators
- Procedure Steps
- Consultation and patch test
- Cleansing and mapping
- Application of lifting solution
- Neutralizing and shaping
- Nourishing and optional tinting
- Final styling and aftercare instructions
- Aftercare Tips
- Avoid water, steam, and makeup for 24 hours
- Use brow serum or oil for hydration
- Brush brows daily to maintain shape
- Schedule touch-up every 6–8 weeks
- Results & Expectations
- Immediate lift and definition
- Brows appear fuller and more uniform
- Minimal downtime
- Gradual fade over time
- Risks & Safety
- Mild irritation or redness
- Importance of certified technicians
- Hygiene and sterilization protocols
- Patch testing to prevent allergic reactions
Brow Tint
- Introduction
- What is brow tinting?
- Brief history and rise in popularity
- Difference between tinting, microblading, and henna brows
- Benefits of Brow Tinting
- Enhances natural brow color and shape
- Defines and fills in sparse areas
- Saves time on daily makeup
- Semi-permanent results (lasts 3–6 weeks)
- Ideal Candidates
- Light or uneven brow hair
- Clients seeking a fuller, more defined look
- Those with busy lifestyles or minimal makeup routines
- Contraindications
- Skin sensitivities or allergies to dye
- Active skin conditions (eczema, dermatitis)
- Recent brow treatments (lamination, waxing)
- Pregnancy or breastfeeding (patch test recommended)
- Tools & Products
- Brow tint kit (dye + developer)
- Applicator brush or spoolie
- Petroleum jelly or barrier cream
- Cotton pads and cleanser
- Procedure Steps
- Consultation and patch test
- Skin prep and barrier application
- Mixing and applying the tint
- Processing time and removal
- Final shaping and styling
- Aftercare Tips
- Avoid water and makeup on brows for 24 hours
- Use gentle cleansers
- Avoid exfoliating near brow area
- Schedule touch-up every 4–6 weeks
- Results & Expectations
- Immediate enhancement
- Natural fade over time
- No downtime
- Customizable shades for different hair tones
- Risks & Safety
- Mild irritation or staining
- Importance of patch testing
- Professional application vs. DIY kits
- Hygiene and sterilization protocols
BB Glow Treatment Presentation Outline
- Introduction
- What is BB Glow?
- Origins and popularity (e.g., Korean skincare innovation)
- Purpose of the treatment
- Benefits of BB Glow
- Evens out skin tone and texture
- Reduces fine lines and wrinkles
- Minimizes pores and dark circles
- Provides a radiant, glowing complexion
- Indications
- Suitable skin types and concerns:
- Dull or tired-looking skin
- Uneven pigmentation
- Acne scars
- Enlarged pores
- Contraindications
- Not recommended for:
- Pregnant or breastfeeding individuals
- Active acne, eczema, or rosacea
- Recent sunburn or facial procedures
- History of keloids or skin allergies
- Equipment & Materials
- Microneedling device or nano-needles
- BB Glow serums (vitamin-rich, tinted)
- Numbing cream
- Cleansers, exfoliants, sheet masks
- Procedure Steps
- Cleansing
- Exfoliation
- Numbing (optional)
- Microneedling infusion of BB serum
- Post-treatment care
- Aftercare Tips
- Avoid sun exposure and harsh products
- Hydrate and moisturize
- No makeup for 24–48 hours
- Use gentle skincare products
- Results & Expectations
- Immediate glow with gradual improvement
- Temporary redness may occur
- Best results after 2–3 sessions
- Risks & Safety
- Mild discomfort or redness
- Importance of trained professionals
- Patch testing for sensitive skin
- Conclusion
- Summary of benefits
- Who should consider BB Glow
- Final thoughts and Q&A
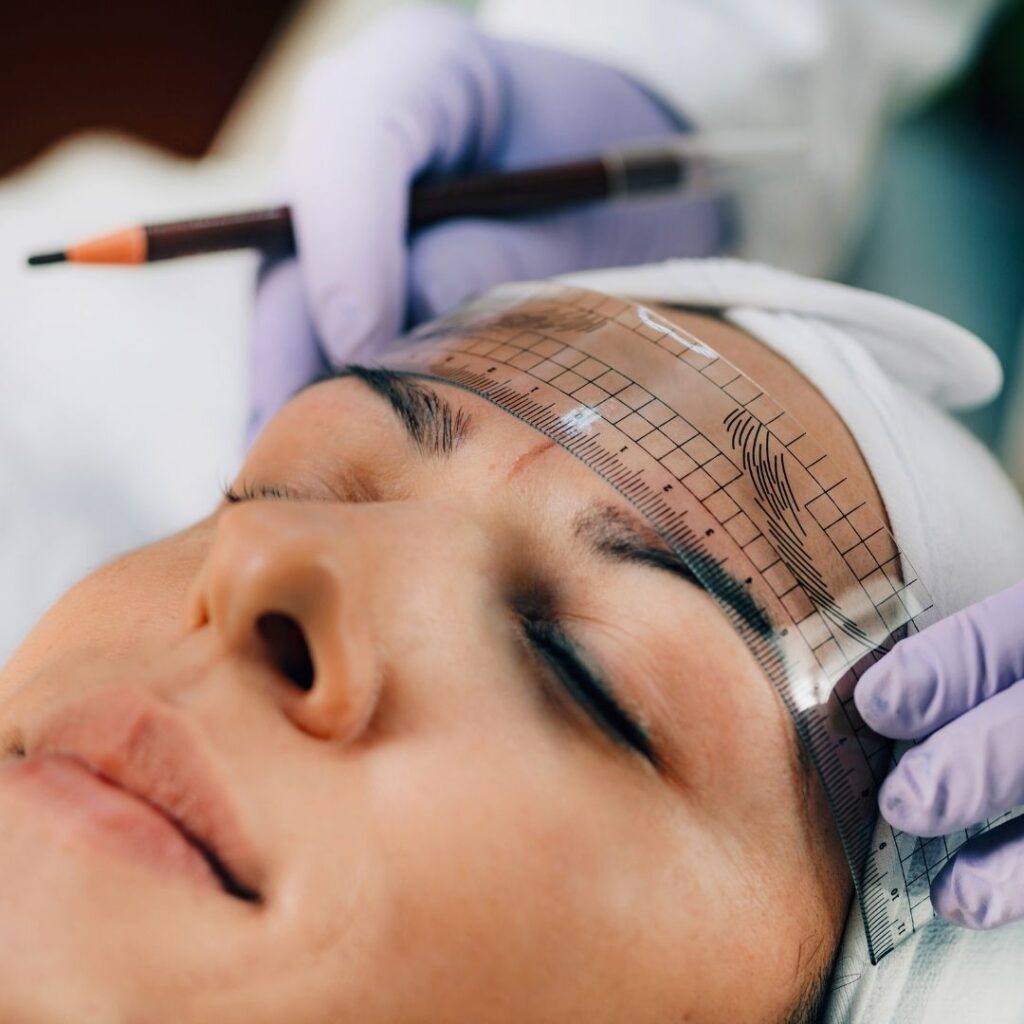
Micro blading What Is Microblading?
Microblading is a semi-permanent cosmetic tattooing technique used to enhance eyebrows by manually depositing pigment into the skin using a fine blade. It creates natural-looking hair strokes that mimic real brow hairs.
🧪 Tools & Materials
- Microblading pen with disposable blades
- Pigments (color-matched to skin tone and hair)
- Numbing agents (topical lidocaine)
- Measuring tools for brow mapping
- Aftercare kits
✨ Step-by-Step Process
- Consultation & Design
- Discuss desired brow shape and color
- Map the brows using measuring tools for symmetry
- Microblading Process step by step shows how mapping and numbing are done before the procedure begins
- Numbing
- Apply topical anesthetic to minimize discomfort
- MICROBLADING eyebrows with machine SHADING step by step demonstrates how numbing and shading are integrated
- Microblading Strokes
- Use the blade to create fine incisions and deposit pigment
- Maintain consistent depth and angle for natural results
- Shading (Optional)
- Adds depth and fullness to brows
- MICROBLADING eyebrows with machine SHADING step by step includes shading techniques for a fuller look
- Aftercare
- Avoid water, sweat, and makeup on brows for 7–10 days
- Apply healing ointment as directed
- Microblading Process step by step explains healing expectations and touch-up timel
Medicated Hydra Facial
- Introduction
- What is a HydraFacial?
- How does a medicated HydraFacial differ from the standard treatment?
- Overview of its popularity in clinical and spa settings
- Benefits
- Deep cleansing and exfoliation
- Infusion of medicated serums (e.g. salicylic acid, glycolic acid, hyaluronic acid)
- Targets acne, pigmentation, fine lines, and dehydration
- Immediate glow with no downtime
- Ideal Candidates
- Acne-prone or congested skin
- Hyperpigmentation or uneven tone
- Aging skin with fine lines and wrinkles
- Sensitive or dehydrated skin types
- Contraindications
- Active skin infections or open wounds
- Severe rosacea or eczema flare-ups
- Allergies to active ingredients
- Recent chemical peels or laser treatments
- Tools & Products
- HydraFacial device with vortex technology
- Medicated boosters (e.g. Dermabuilder, Britenol, Rozatrol)
- Serums tailored to skin concerns
- LED light therapy (optional)
- Cleanser, exfoliator, and moisturizer
- Procedure Steps
- Skin analysis and consultation
- Cleansing and exfoliation
- Acid peel application
- Extraction using vortex suction
- Infusion of medicated serums
- Optional LED therapy
- Final hydration and protection
- Aftercare Tips
- Avoid harsh products for 48 hours
- Use gentle, hydrating skincare
- Apply SPF daily
- Stay hydrated and avoid excessive sun exposure
- Results & Expectations
- Brighter, clearer skin immediately
- Continued improvement over days
- Minimal redness or irritation
- Recommended monthly sessions for best results
- Risks & Safety
- Mild tingling or redness
- Importance of patch testing for medicated boosters
- Professional application and hygiene protocols
- Customization based on skin type and concerns
Course Highlights
Hands-On Training: Practice on models under expert supervision to build confidence.
Professional Tools: Use industry-standard equipment and products.
Personalized Feedback: Receive tailored guidance to refine techniques.
Certificate of Completion: Earn a recognized certification to launch your career.
- 15 Days
- Certified
- Popular
Begin Your Journey in Beauty and Aesthetics Now
Get Started
Discover What Our Students Say
Testimonials

I’m loving my cosmetology journey here! The comprehensive curriculum and expert feedback are preparing me to excel in the beauty industry as a student.
As a student, I found the microneedling and mesotherapy course amazing! The hands-on sessions and detailed guidance helped me gain confidence in treating skin issues effectively.

Learning non-invasive techniques with this course was a game-changer! The practical training and supportive instructors made it easy to master the skills I needed.

As a cosmetology student, I’m thrilled with the advanced techniques I’m learning. The practical approach and amazing instructors are setting me up for success!